we're finally getting some almost-not-frigid temperatures around here, so i'm feeling the pressure to share this super cute winter project with you before i'm completely taken over with wanting to make flowery springtime things!
a snowball pom pom wreath!
 i'd been wanting to make a yarn-wrapped wreath for some time now, but as i gathered up some materials from here and there the ''vision started changing... i had a foam wreath & a package of 10 styrofoam "snowball" ornaments from the dollar store, and as soon as i saw these packages of soft, fluffy wintery-creamy pom poms, i was suddenly envisioning a winter white snow ball wreath! it just seemed right for all the snowy days we've been having around here since christmas & i spent one really cozy night in front of the fireplace making it:

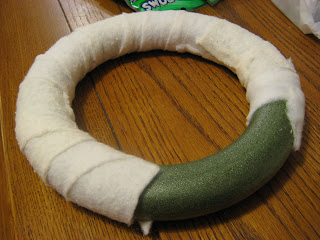
 i started by wrapping my foam wreath in batting to make it a little fluffier & also so the green wouldn't show through my creamy pom poms. i gently stretched it & wrapped it around as i hot glued it:

 once the whole wreath was wrapped, i added a little strip of my favorite unbleached cotton fabric [$2 a yard at walmart! love love it] to hang it by. i glued the loop in place & tied a loose knot at the top:
 then i took the snowball ornaments which were basically just styrofoam balls with a little ornament topper glued on- but at 10 for $1 they worked perfectly! i popped the topper off & wrapped them in skinny cream yarn:
 i left 2 long strands so that i could tie them around the wreath. this way you can slide them around a little until they sit how you want them to on the wreath without hurting it- they'll get secured down later!
 then i made some big, fat fluffly poms with thicker yarn & have to say why have i never made these before?? they were so fun & easy to do! there are lots of great tutorials out there, here are a few quick photos of how easy it is:


 i situated the yarn wrapped balls and the large poms together around the wreath, spacing them out since they're the biggest parts of the wreath. the big poms can be tied on just like the snowballs! you also want to make sure your wreath still lays flat.
 next is to get a little little fluffy poms glued around to fill the empty space. i only suffered about 3 1st degree glue gun burns on this part- every time i'd get one covered in a good blob of hot glue the whole pom would go rolling down my finger like a little lava-covered cotton ball- ouch! not even kidding... some of those fancy glue gun tweezers or something might be a good idea here!

 start by nuzzling your little poms up & around the bigger poms & yarn balls- that way they won't move around when the whole thing is done!
 fill in all the empty space [this part can take a little while!] and then you're done! the cutest, fluffiest little winter wreath ever!
here it is in the daylight. the hanging loop ended up a little too short, so i just clothespinned it to the top of my paper bag wreath for now:

 it makes for a really nice winter-white mantle- perfect for the still-snowy 'gap' months between christmas & spring!
a snowball pom pom wreath!
 i'd been wanting to make a yarn-wrapped wreath for some time now, but as i gathered up some materials from here and there the ''vision started changing... i had a foam wreath & a package of 10 styrofoam "snowball" ornaments from the dollar store, and as soon as i saw these packages of soft, fluffy wintery-creamy pom poms, i was suddenly envisioning a winter white snow ball wreath! it just seemed right for all the snowy days we've been having around here since christmas & i spent one really cozy night in front of the fireplace making it:
 i started by wrapping my foam wreath in batting to make it a little fluffier & also so the green wouldn't show through my creamy pom poms. i gently stretched it & wrapped it around as i hot glued it:
 once the whole wreath was wrapped, i added a little strip of my favorite unbleached cotton fabric [$2 a yard at walmart! love love it] to hang it by. i glued the loop in place & tied a loose knot at the top:
 then i took the snowball ornaments which were basically just styrofoam balls with a little ornament topper glued on- but at 10 for $1 they worked perfectly! i popped the topper off & wrapped them in skinny cream yarn:
 i left 2 long strands so that i could tie them around the wreath. this way you can slide them around a little until they sit how you want them to on the wreath without hurting it- they'll get secured down later!
 then i made some big, fat fluffly poms with thicker yarn & have to say why have i never made these before?? they were so fun & easy to do! there are lots of great tutorials out there, here are a few quick photos of how easy it is:


 i situated the yarn wrapped balls and the large poms together around the wreath, spacing them out since they're the biggest parts of the wreath. the big poms can be tied on just like the snowballs! you also want to make sure your wreath still lays flat.
 next is to get a little little fluffy poms glued around to fill the empty space. i only suffered about 3 1st degree glue gun burns on this part- every time i'd get one covered in a good blob of hot glue the whole pom would go rolling down my finger like a little lava-covered cotton ball- ouch! not even kidding... some of those fancy glue gun tweezers or something might be a good idea here!
 start by nuzzling your little poms up & around the bigger poms & yarn balls- that way they won't move around when the whole thing is done!
 fill in all the empty space [this part can take a little while!] and then you're done! the cutest, fluffiest little winter wreath ever!here it is in the daylight. the hanging loop ended up a little too short, so i just clothespinned it to the top of my paper bag wreath for now:
 it makes for a really nice winter-white mantle- perfect for the still-snowy 'gap' months between christmas & spring!
 the whole thing cost me about $9... $1 each for the styrofoam balls and wreath form $2 each for 2 packages of little poms & $3 for the fat yarn! the skinny yarn & fabric scrap was from my stash.
sooo fun! is this a hot-glue project you would try?