12.31.2010

like handmade friends.

putting away the christmas decorations is always a bit of a bummer for me- it's so fun for the house to be so full of merriment, and then it just feels so naked when you take it all down! although i must admit i do like having the space in the living room back from where the christmas tree was [K has her little toy corner back!]

i thought as i was carefully packing up each ornament, wrapping it & tucking it into its little pocket in the ornament box, that i would get some pictures of some of the handmade ornaments over the years. i like the idea of making at least one each year, and i can't wait to see some of the ones that K will make as she gets bigger!
i started with these beaded stars forever ago. they take forever to make but turn out so beautiful and sparkly when the lights hit them!
the anthropologized felt star- i think it might need some glitter.
the little felted crocheted snowflake- still one of my faves!
the little felt flower ornament made from a jar lid!
i made this little glass snowflake one this year by punching out snowflake shapes with a paper punch on aluminum tape [from home depot- i think it's meant for pipes or something?] & then adding some 'faux snow' inside. love it!
probably my favorite one: last year i made these flat etched glass ornaments- the snowflake one was my tester & the other was a gift for my brother & sister in law. i have one more blank one sitting unfinished in the craft room to make one with my family name. i love family/monogram kind of ornaments!
it's not on the tree because only one of my salt dough ornaments turned out cute enough to keep... painting them got a little experimental! i think i'll try again next year when K is big enough to help.

we have a cute little collection of some kiddo-made ornaments that my mother-in-law saved of my husband's and though i don't really have any i made as a kid, we have lots that my mom made over the years which are just as special. the only good thing about packing them all up is thinking of how in just a few months i'll get to pull them back out like old friends.

merry christmas & happy new year!

12.28.2010

the stocking success story!

it started out as a saga- a near disastrous event starting with 1 overly optimistic crafter & ending with 3 paper bags hung by [sitting below] the chimney with care.
i'm speaking of my attempt to make homemade stockings for my family last year. in short, i started too late and ended up choosing to sit and smootch with my hubby by the light of the tree on christmas eve rather than shiver in the cold basement with my sewing machine. and despite the fact that i had relished in the thought of a whole year to finish them, they sat on my craft table in a little bag, only to be pulled out again, last second, & still totally unfinished this year.
precious hubs knew not to mention it, as i had already mentioned that the stockings must happen for real this year. however, when he asked ever so gently and carefully on christmas eve-eve if the stockings were going to happen, i said yes. and i meant it. even if i didn't sleep all night to finish them. i even brought my sewing machine up from the cold basement, figuring that trying to sew with numb fingers wasn't helping the equation any.

1 christmas cd on repeat, lots of mugs of apple cider, and a few stretch breaks later, they were done. at 2:14 in the am. and so, ladies & gentlemen, i present to you the finished stockings:
left to right they are kenna's, mine, and matt's. halfway through lining kenna's i realized the fabric i picked for kenna's lining would have been perfect for the frontand now i'm tempted to redo it... but "fixing it" would truly mean redoing it almost from the beginning & i'm just not sure i'm willing to do that.

here are some of the fun detail-y things up close:
i'm choosing not to allow the fact that there are still technically 2 unfinished stockings [1 for baby-boy-on-the-way and yes, 1 for the dog] sitting in pieces on my dining room table deter me in any way from considering this a success story. i'm also ignoring the silly fact that we had to line them up on the bench beside the mantel because we still didn't have stocking hangers [bought them 50% off this week at the after christmas sales!]

and best of all, i got to see my little girl up to her armpit pulling tiny gifts out of homemade love. totally worth it.

12.26.2010

hovering.

so, christmas is just now ending... we're hovering in the glow of freshly fallen snow [8 inches!] and a christmas tree i don't quite want to take down yet. and though i feel the relaxation of no more immediate major deadlines to get things made as gifts, i am starting to feel the flood of things i want to make now that christmas is over....

things for next year, ornaments i want to make/finish before i pack up all the other christmas stuff, and wanting to make the house a winter snow cabin to avoid the usual post-christmas-decorating-letdown [ie: when you take down all the christmas decorations and the house looks naked! is that just me?]

and of course, there seems to be always the ever-present desire to completely redecorate the house, made only more intense and more crazy-driven thanks to the nesting flurry of only 10 weeks [!!!!!!] left to go!

so, until i catch up on a few tutorials and fun things i have started [but not finished before christmas!] here are a few inspiration photos i'm pondering, constantly thinking of ways to make home more homey:
because it is.
for christmas next year- extra fluffy wreaths
loving that blue & the his/hers effect- & i am now scouring craigslist for the perfect table to saw in half!
because a new year & an entire line of new products is coming your way from leaf&letter... & the flower hair clips must be displayed like this!

[ps- so, so sorry to not include photo credits- these are from my random inspiration folder & apparently i was too lazy to bookmark the original site. many apologies!]

12.18.2010

ok, internets.

you're killing me here. i mean, really? less than a week before christmas & you're going to deliver a handful of the cutest little crafty ideas i may have ever seen?

i shouldn't be surprised... it happens every year. i make a list of ornaments i want to make, and then somehow it just doesn't happen. then i look over the list later & think well that's ok. maybe next year. but these are just too cute!

mini yarn wreath ornaments:
which means you could also make ruffle felt wreaths in mini-ornament form!
adorable paintstick ornaments:
tiny garland trees with wine cork stands:
and ok, not technically christmas related necessarily, but i'm dying to make some of these amazing tiny wooden cupcake stands!
i did make 1 this year... probably the secret to its success was that it was made back in november. and now i have to head back down into the craft room & get busy on these adorable ideas!

12.17.2010

christmas 2010!

i had a hard time figuring out where i wanted to go with our christmas decor this year. i wanted to do something a little different than the red and white of last year, but realized we really didn't have anything else since we were almost starting from scratch last year after all the moves. i thought about green trees with a snowy cabin feel, i thought about traditional red & green mixed together, and nothing felt quite right. and of course, we have the same tight budget as last year [aka, no buying out pottery barn anytime soon.]

but after seeing this tablescape by the nester full of white dishes [my obsession], neutrals, a little silver-snowy-sparkle, and all kinds of basket-y goodness, i knew that was it. about $10 at the dollar store and $12 at target later [that purchase included faux snow... whee!] we had a reasonably presentable-y decorated house.

the mantel:
i kept my paper bag wreath up [even though i really, really want to make a green ruffly felt one]. i have been amazed at how well this paper one has lasted and fit in with every decor i've put together so far- just what i wanted from a neutral little wreath!
i continued the basket-y and twinkly theme with some rattan ball light strings that i got from target forever and a day ago [always intending to put them out on the porch but never did] and some branches with twinkly lights in vases. i got 2 additional tall candleholders from the dollar store and filled them with kraft paper shreds and silver ornaments. everybody's christmas cards as we got them in the mail added just the right amount of color!
speaking of color, oh deer got a little himself... getting into the christmas spirit with a pretty red scarf. doesn't he look ready to go caroling?
the living room shelf still had the pins in for the felt snowflake trim and i added all my little winter trees around the pictures. doesn't it look much more warm & friendly than last year when it was so sparse?
and finally, the tree. which i can't take much credit for since my sweet hubby has decorated it for me each year since my mom died. i seem to get partially paralyzed at the thought of it since it used to be our tradition to decorate it together- it became a sad thing instead of a happy thing marking the start of christmas. but once it's done, i love to just sit and look at it, snuggling up on the couch with the puppy or to watch a movie after little one has gone to bed. and i love that it's right in the window where passing neighbors can see it- what's more cheerful than a twinkly christmas tree through the window?

& you can see the debut of my merry christmas banner that i started last year and finished around november of this year- SO determined to be able to finally use it!
the stockings are still in progress, the christmas pillows i have planned are holding on by a thread, and the advent calender i wanted to make i had to just let go of for this year... but oh well! i think kenna will be able to understand it better next year anyway. [or at least that's what i'm going to tell myself as i furiously sew stockings the day before christmas eve, desperate to have them done!]

the front door:
i unintentionally went for sparse and wintery with the front door- i moved those black urns from the back porch to the front & then was at a complete loss of what to put in them! a little moss and faux snow [also from the dollar store] at least made them look a little more wintery [once we took the pumpkins out!]
& my favorite part- this year's incarnation of my grapevine wreath, with acrylic snowflakes and tiny silver ornaments tied on with twine. the tin "noel" is from target a couple years ago & has two tiny jingle bells on it!
& since she inspired my "theme" this year, i'm linking up just for fun to the nester's christmas tour of homes- man alive, there are some pretty houses out there!

12.13.2010

on the cheap: salt dough ornaments!

if there were ever a truly quick & easy & fun christmas idea to share [not to mention insanely cheap], it would definitely be this one! salt dough is probably as old as the hills, but i have to credit one of my favorite crafty-momma sites, prudent baby, for bringing it up to date with this amazing tutorial!

this seriously couldn't be easier [& the tutorial explains it perfectly & gives lots of ideas!]

you will need:
1 cup all-purpose flour
1/2 cup table salt
1/2 cup water

& that's it! just mix it up in a mixer until it makes cookie-dough consistency dough, smush it up, roll it out, & use cookie cutters on it like you would normal cookies. i have a sad lack of cookie cutters around my house so i used some of my daughter's plastic play ones from her play kitchen... what could be happier than making cute ornaments with pink plastic cookie cutters?

i did bells and stars and attempted a little toddler handprint one [i made a clay footprint ornament from the year she was born & was barely a month old at christmas & it's so precious to me now- her hand is already bigger than her newborn foot was!]. i was thinking it would be cute to put kenna's thumbprint in the little stars for the grandparents. they look like cookies but i'm sure would taste completely disgusting:
then you just pop them in the oven at 200 for 4-6 hours or overnight until they're dry [halfway through i flipped mine over]. then the fun part... paint or glitter however you like!

now, allow me to assure you that the "quick & easy" part ends here if you are, like me, completely a perfectionist & especially prone at the moment to angry pregnant hormonal breakdowns if you flick the brush wrong you mess up 30 minutes of detailed painting work. only the star turned out somewhat well, although the gold i added looks more like smeary paint than the light wash of shimmer i had hoped.
instead of throwing them in the trash & walking away [as i wanted to do last night] i picked up some cheap glitter glue and red glitter today to try to salvage them. this one looks a bit like an iced cookie when covered in glitter glue:
and the rest of the bells i just painted white and outlined in glitter glue and then glitter. not what i was originally going for, but not a complete craft fail thank goodness!
[ps- someday it will not become night time every day at 4 pm and i will be able to attempt decent pictures again. i hope you will still be reading this blog and will not have totally given up on me when that day finally comes.]

12.08.2010

on the cheap: christmas card scrapbook!

i guess this idea would only work as a gift for someone else if you were in the habit of saving all the christmas cards someone else sends you... but it's something i've wanted to do ever since we first got married & started sending out our own cards, especially since some of them have been handmade! it's especially ideal for christmas cards where they can vary really widely in size and not fit in traditional simple photo albums.

i originally saw this idea on young house love's blog as a baby book, and thought it would be a quick fix for archiving all the christmas cards i wanted to save. it really is a simple, simple project with just a few easy materials!

all you need is:
-an 8x8 diy scrapbook with slide-in pages
-a pack of 8x8 scrapbook papers, two-sided in pretty christmas-y patterns
-photo safe double stick tape/squares
-all your christmas cards!
-number stickers or stamps to note the years [optional]

step 1:
make sure your paper pack size fits your scrapbook size, ie: 8x8 and 8x8... this is completely key to it being the easiest project ever!
step 2:
pick a paper that coordinates with your card, and stick 4 double stick squares on the back of the card, one in each corner. slide out the white paper stock in the scrapbook sleeve, and slide in the pretty paper with your card attached.
step 3:
repeat for all your cards, and add number stickers or stamps to chronicle the years [i'm apparently terrible about not printing what year it is in the information on the card!]
and done! you can also make a fun title page with stamps or stickers, which i'm still planning to do for this one!
looking through the old cards made me realize how many of them i've ordered from shutterfly, especially our christmas card/baby announcement hybrid of 2008. they are just the best for christmas cards, baby announcements, or even new year's cards if you missed the boat on christmas one year! not entirely handmade, but you do get to pick a design and a photo and add your own info, and it's much easier to send out 100 christmas cards when you haven't sat up all night handstamping and gluing them [yeah... did that one year. and only sent 20 cards because of it!]

the best part is that this year, they're offering anyone who writes a blog 50 christmas cards for free! all the details are right here. you'd better believe i'm taking them up on it! now i just have to decide which photo to use this year...

12.05.2010

snowy surprises.

every once in a blue moon it looks like this in our little town of suburban north carolina [although rarely this early in the year!]. the streets shut down, people come out of their houses to laugh and throw snowballs, & the stores have run out of bread & milk because of the mere suggestion of the possibility of snow:
and every year, i get in the mood to do this:
is there anything more beautiful than falling snow? especially from warm and snuggly indoors, with warm socks & a burrowed puppy on your feet, by the light of the christmas tree:
this year, it is a brown ruffly scarf [from the most fun pattern!]. last year it was a hat. and look, oh look, how cute that hat is this year:
gracious, when did those little cheeks get so grown up? i don't know who's happier the hat still fits, my hat-obsessed little girl or her momma.
happy snow day! winter is finally here.

12.04.2010

diy gift card holders& a giveaway!

i've heard some people say they think giving a gift card is a tacky, impersonal gift. i however, love them. i love gift cards. because not only have you given me a gift to unwrap, you've also given me the gift of going shopping to pick out something i love. 2 in one!

the trick for me though is that when i give a gift card, i want it to have a really cute little home. i don't want just the mini paper envelope it comes in at the store [although i do love mini paper envelopes.] i want it to be able to hang on the tree and/or have a little something extra that makes you even more excited that it is a gift card! so i came up with this little number:
i thought some felt card holders would be super cute done in different christmas shapes- a stocking, ornament, mug, and a tree! if you have all the ingredients in the right place at the right time [i swear i spend 90% of my crafting time running down to the basement to the sewing machine, back up to the kitchen to take a picture, upstairs to the iron, etc...] you could spend one naptime, about an hour, whipping a few of these up! & now i'm looking for excuses to give everybody on my list a gift card!

i created a template especially for this project. you can click this link & save it as a photo [jpeg] or right click the photo below to save it- then just print with your options set at "letter size" [in other words, one full sheet of normal printer paper] & it should fit your standard gift card perfectly!
you will need:
christmas shapes template
a few sheets of felt [love me some eco-felt!]
scissors
sewing machine or glue gun
tiny scrapbooking grommets & setter [optional- i used 1/8"]
ribbons etc. of your choice!
step 1:
print out the template & cut out 2 identical copies of your shape. double check it with your gift card to make sure it fits within the edges!
step 2:
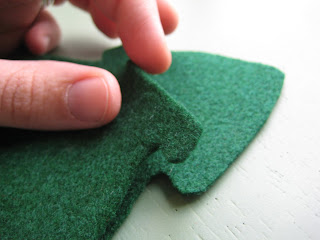
using your gift card as a guide, cut a strip off of the top shape so that the gift card is slightly visible at the top- so that it will come out!

step 3:
stitch or hot glue any embellishments you'd like to the front of your shape- anything you can imagine! sequins, glitter glue, ribbon, trim, decorative stitching, or even more felt shapes. i stitched on ribbon & some pom-pom trim & took advantage of my sewing machine's awesome snowflake stitch!

step 4:
carefully stitch or hot glue around the edges of the shape so that your card will fit in. you can go all the way around without stopping, or just go from one edge of the opening to the other- just don't sew your opening closed!
step 5:
poke a tiny hole in the top of your shape & set the grommet according to the instructions on the packaging. if you don't want to mess with this, just poke a tiny hole & string some ribbon through. i used skinny jute twine- love it for hanging ornaments!
at the last second i also added a little circle of contrasting felt for more color & to stabilize it [ie: the grommet is set through 2 pieces of felt]. i thought it turned out cute, totally optional though!
lastly, slip a loaded gift card in to hang on the tree [or tie to another gift!] for your lucky and unsuspecting recipient! yay!
here are the other cute patterns all finished:
[the ornament doesn't have its grommet because the grommeting became a tad noisy as the night got later...]
how cute would this mug be with a coffee/tea card any time of year?!
and one of my favorite ways to give a gift card would be to make a cute luggage tag & slip a starbucks gift card inside... who doesn't love getting a quick starbucks while they wait in the airport? perfect for a friend who travels often!

so... on to the good stuff... i am giving away all 4 of these gift card holders! just leave a comment here on this post to say hello or your favorite place to buy gift cards from, and i will enter you in a drawing to win one! let me know if you have a preference which one you like best [i'll do it first come first serve.] everyone is welcome to enter [especially if you're brand new here or know me in real life] & don't forget your email!

i'm going to be doing a series of quick & easy gifts/decor ideas for christmas in the next couple of days... check back often for more project ideas!

LinkWithin

Related Posts with Thumbnails