6.30.2012

quickie frame project.

now that K is making lots & lots of little art around our home, i thought it would be fun to display some of it in her room. i wanted to frame it up nicely, with mats & everything! [usually i just pop stuff in a frame willy nilly, no matting.] when she discovered a 3 sided highlighter with bright pink, green & yellow, she made some really cute scribbly pictures that i thought would be great colors for her room!

but of course, i had to do it on the cheap. so i found these two frames at goodwill, with mats in them, for $2.50 each. yay! have no fear, they will not stay this way for long...
 let me be the first to say that working with old frames sometimes is NOT easy. these were particularly difficult to get the glass back into the frames without breaking them or chipping the edges. i may or may not have ended up almost in tears & handed them over to my husband to try since the only thing that would make me more mad than that glass not fitting was if it broke completely.

i painted the frames a nice glossy white, & sprayed primer all over the paper mats to make them a nice flat white. it bubbled ever so slightly, but you really can't tell when it's under the glass. & look how cute with her little kiddo scribbles in there!

 the frames fit just perfectly between her bedroom door & closet doors. i couldn't be happier with how they fit & we love to see them hanging there when reading books at bedtime.
& someone else is pretty proud of her artwork too!

6.28.2012

pinteresting: fabric wrapped chandelier!

sometimes there are beautiful lovely creative ideas that are so pretty you just have to pick up right away & go make your own interpretation of it! such was the case when i saw this completely adorable fabric wrapped/tied lampshade [she calls it a scrappy lampshade] by lindsey at the pleated poppy:
so creative & colorful & perfect for a little girl room, right? except i didn't have/need a lampshade for K's room, so i started with this white wire basket from the dollar tree, & lots of strips of fabric leftover from making my fabric wrapped bangles.
then i snipped the bottom off with some metal snips. i figured i could rig it somehow to hang from her boring builder-grade light fixture in the middle of the room [our whole house has them. blech.] i chose to snip the entire bottom right up to the edge like this:
but if i was going to make a lampshade with it i would have left a little border to hang it with like this:
then i started wrapping the top and bottom, mostly to cover the sharp edge:


please excuse the weird bump- i originally tried to tie a new strip on & then wrap the knot to hide the starts & finishes but later just ended up tying them & leaving the ends out & it looked much better. then the rest was just picking fun colors & trying to space them out, weaving them over & under, and knotting them to start a new strip when each one ran out!
...until the whole thing is covered. it was a very fun and a pretty quick project depending on how many little encouragers you have helping you, full of freshly-napped what-doin-momma energy.
and here it is hanging in her room:
i ended up rigging it over her existing 'bulb' light... i just took off the glass cover & hooked the edge of the basket onto the little screws that normally hold the glass bulb onto the light fixture on. the small edge of the basket actually fit perfectly around the metal base of the fixture. we put the glass bulb away & also removed the lightbulb since i wasn't sure if it would be a fire hazard with the fabric touching the metal base. 
so here's to finished projects & thanks lindsey, for the inspiration!

6.27.2012

trash to treasure: chevron doormat!

i've been working on a big stenciling project [my very first!] that i can't wait to have finished enough to share! in the meantime, i noticed how drab & sad my front doormat was looking after 3ish years of use. it was originally a really cute jute-type one from world market with a cute asymmetrical green design on it. well, the green is all gone & the edges are looking really ratty. however, #1- not even a $16 little world market number is in the budget right now, & #2- we may or may not be moving soon & if we do, i'd love nothing more than to toss this one & not have to worry about moving it.
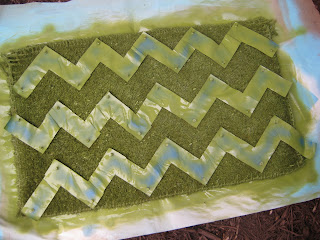
so... enter my best friends. tape + spray paint. nice thick 2 inch painter's tape & krylon's ivy leaf to be exact. i thought a chevron pattern would be a fun & easy way to go!
i cut 6 inch pieces of the tape with somewhat squared off tops & bottoms & then started at the center of the top row placing them in an approximate chevron pattern. luckily, the strips ended up fitting pretty well & looked pretty clean on the edges. the tape did not stick as well as i'd like [maybe clear packing tape would have been better?] but they did work a little better when i stepped down hard on each one with my foot. i also went back & stuck the points of each chevron down with a thumbtack to keep them from blowing up when i spray painted it.
i did the top & bottom rows first, & then did the middle row third to try to get the spacing as even as possible.
a little spray paint & there it is! not too terrible for squeezing just a little more life out of our worn out doormat. i like the extra pop of color & pattern at our doorway!

before:
after!

6.14.2012

loving some ikea recently!

remember the time i fell off the earth? obviously not really, i'm just finding it difficult to manage my time with 2 little ones running around- but i have so many half-finished projects waiting in the wings you would not believe it! but luckily, several of them are almost done & that means i can get back into my little space here with some fresh, fun new projects & ideas! yay!

until then, i had to make a mental note here of a really amazing frame i discovered recently [& yet one more reason to mourn the fact that our local ikea is 3 hours!!! away from us].

i pinned this really adorable pink & green frame with the letter k [just like my baby girl] 8 weeks ago, according to pinterest, with the caption 'must find a frame like this for my k!'

i absolutely loooooved the frame, but assumed it was some one-of-a-kind thrift store miracle find that others seem lucky enough to find for mere pocket change. but then, i started seeing the same frame all over the place, in lots of different beautiful colors & loving it every time!

& this last one just makes me laugh because i think it shows how full-circle the diy/crafty/thrifty movement has come... a major manufacturer [ikea] made a frame intended to look like an old thrifted brass frame but modernized it by offering it in a black finish... so this couple bought it & painted it gold to make it look like a thrifted old brass frame! beautiful, and funny.

so after seeing this thing everywhere, lo & behold, i discovered it is actually the ung drill frame from ikea & can be mine all mine [or several, even!] for just $30! i call that winning. of course, it is one of the many elusive products that don't actually ship from the website... you have to be in-store to purchase it. it's been a frustration that so many of their products are like that, but i'm sure it's saved me boat loads of money over the years that i can't just pop it all in my online cart & shop!
[photo from ikea's website]

now, if i can just get my hands on some henny cirkel curtains for baby boy's room... oh, & an egeby rug to paint for the kitchen & dining room... & these beachy woven placemats at a crazy great price... & this ridiculously cute white enameled pitcher in several sizes... & i'm dreaming of a 5 cube expedit for my craft room...

 ok, that's quite a wish list! maybe i need to start saving my pennies for an ikea road trip!


LinkWithin

Related Posts with Thumbnails