
i apologize from the get-go for what will probably be terrible pictures in this little how-to! i've been relegated to crafting in the evenings, long after the winter sun has disappeared, & especially in the recently rain [that we wish was more snow!]. i can't quite get used to the dark of night at 5:30 pm- there's just been no sun!
i've been indimitated to try making one in the past, but i've wanted an apron for so long now, i ended up just asking M to buy me one for my birthday... thankfully we found some super cute handmade ones at a craft fair on a recent trip. that way at least it was still handmade, i completely love it, & i had no idea how much i would fall in love with wearing it!
my sister-in-law and i like to try to & out-do each other with our sentimental gifts. this year, naturally thinking along the line of aprons, i decided i would finally go for it & make her one [& ended up wanting to make myself a coordinating one!] i decided on this simple method that turned out really cute- it is a little involved if you aren't super comfortable with your sewing machine. i wouldn't necessarily call it "quick & easy" [a little bit more of a labor of love, honestly] but don't be intimidated, just try it! i they make perfect gifts!
what you'll need:
-a small apron of simple shape [or large, whatever seems will fit your apron wearer]
-about a yard of fabric for the apron
-about 1/2 yard coordinating fabric for the ties
-any ribbon or trim etc. you'd like to embellish it with
 step 1:
iron your fabric, fold it in half & lay it out flat. place your apron on top & smooth it out.
 step 2:
cut around your apron shape with an extra 1/2 inch or so [cut straight across the top, not around the ties!]. since your fabric was folded, you should have 2 apron shapes.
 step 3:
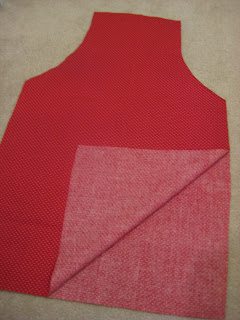
put the 2 apron shapes face-to-face, right side of the fabric to right side. stitch all around the edges, leaving a little un-sewn space to turn it right-side out with.
 step 4:
turn it right-side-out, sew up the little space, and iron it again so that the edges are flat. it's optional, but sewing around the entire apron right at the edges at this point will make it look more finished and professional!
 step 5:
cut about a 2 strips, about 3 inches wide, of your coordinating fabric for the waist ties and 2 strips about 1 inch wide, for the neck ties. use the ties on the original apron [& the size of your apron wearer] to guide you on the length they should be. you can roughly tie them around yourself if you're unsure!
 step 6:
sew the 2 strips face-to-face & turn right side out just like you did with the apron. then attach the smaller one to the neckline. the longer one should go across the front of the apron & be stitched around the top to stay in place.
optional:
i actually ended up using some wide twill tape for the neck straps because my fabric strips were so thin it made them insanely hard to turn right-side-out. if you have more patience than me [or cut the strips more carefully!] there shouldn't be a problem, but the twill tape was easy & i liked how it looked! all i did was fold under the exposed edge & then stitch a square with an 'x' through it to secure it [like a purse handle!]

yay! you made an apron!
 now the fun part: embellish however you'd like! this is where the sentimental part came in for me- i scanned a copy of my mom's chocolate chip cookie recipe card onto printable fabric, cut it out, sewed it at the top of the apron, & then zig zag stitched the edge.
 i love that it is in her handwriting & has all the stains & marks of a well-loved recipe.
 this little number was a christmas present for my sister in law- i've had to hold off on posting this one to keep from spoiling her surprise! i love thinking of her being able to wear this & thinking of my mom each year at christmas, baking cookies [& as she pointed out- using the recipe!]
i made the steps as detailed as i could, but i realize the pictures weren't too self-explanatory. please leave comments & questions if you're confused or get stuck- happy apron-making!
i've been indimitated to try making one in the past, but i've wanted an apron for so long now, i ended up just asking M to buy me one for my birthday... thankfully we found some super cute handmade ones at a craft fair on a recent trip. that way at least it was still handmade, i completely love it, & i had no idea how much i would fall in love with wearing it!
my sister-in-law and i like to try to & out-do each other with our sentimental gifts. this year, naturally thinking along the line of aprons, i decided i would finally go for it & make her one [& ended up wanting to make myself a coordinating one!] i decided on this simple method that turned out really cute- it is a little involved if you aren't super comfortable with your sewing machine. i wouldn't necessarily call it "quick & easy" [a little bit more of a labor of love, honestly] but don't be intimidated, just try it! i they make perfect gifts!
what you'll need:
-a small apron of simple shape [or large, whatever seems will fit your apron wearer]
-about a yard of fabric for the apron
-about 1/2 yard coordinating fabric for the ties
-any ribbon or trim etc. you'd like to embellish it with
 step 1:
iron your fabric, fold it in half & lay it out flat. place your apron on top & smooth it out.
 step 2:
cut around your apron shape with an extra 1/2 inch or so [cut straight across the top, not around the ties!]. since your fabric was folded, you should have 2 apron shapes.
 step 3:
put the 2 apron shapes face-to-face, right side of the fabric to right side. stitch all around the edges, leaving a little un-sewn space to turn it right-side out with.
 step 4:
turn it right-side-out, sew up the little space, and iron it again so that the edges are flat. it's optional, but sewing around the entire apron right at the edges at this point will make it look more finished and professional!
 step 5:
cut about a 2 strips, about 3 inches wide, of your coordinating fabric for the waist ties and 2 strips about 1 inch wide, for the neck ties. use the ties on the original apron [& the size of your apron wearer] to guide you on the length they should be. you can roughly tie them around yourself if you're unsure!
 step 6:
sew the 2 strips face-to-face & turn right side out just like you did with the apron. then attach the smaller one to the neckline. the longer one should go across the front of the apron & be stitched around the top to stay in place.
optional:
i actually ended up using some wide twill tape for the neck straps because my fabric strips were so thin it made them insanely hard to turn right-side-out. if you have more patience than me [or cut the strips more carefully!] there shouldn't be a problem, but the twill tape was easy & i liked how it looked! all i did was fold under the exposed edge & then stitch a square with an 'x' through it to secure it [like a purse handle!]

yay! you made an apron!
 now the fun part: embellish however you'd like! this is where the sentimental part came in for me- i scanned a copy of my mom's chocolate chip cookie recipe card onto printable fabric, cut it out, sewed it at the top of the apron, & then zig zag stitched the edge.
 i love that it is in her handwriting & has all the stains & marks of a well-loved recipe.
 this little number was a christmas present for my sister in law- i've had to hold off on posting this one to keep from spoiling her surprise! i love thinking of her being able to wear this & thinking of my mom each year at christmas, baking cookies [& as she pointed out- using the recipe!]
i made the steps as detailed as i could, but i realize the pictures weren't too self-explanatory. please leave comments & questions if you're confused or get stuck- happy apron-making!


