10.13.2011

pinteresting: paint stick letters!

prepare yourself for the cutest, cheapest craft in the history of ever.

i was really thrilled when i pinned this cute paint stick letter on pinterest:
i wanted something big, dramatic & monogram-y for above finn's crib. i'd considered getting the ginormous paper letters from joann's, but couldn't quite talk myself into spending even the fairly reasonable $30 for the 3 of them. so when i realized i could make big letters without tons of decoupaging & with supplies i mostly already had, i jumped on it!

big adorable handmade decor for next to nothing? you're speaking my love language.

all you need are craft paint, a few paint sticks ( i never leave home depot without a handful, even if i'm not painting) & some small, very inexpensive bolts with nuts to 'close' them. you can see in the second one what kind of bolts i used.
[edited to note: home depot's paint sticks are WAY better than lowe's. they look like real wood, whereas lowe's looks like pressed plywood. i found this out the hard way after getting about 5 bajillion of them from lowe's for another project & wishing i'd gotten them all from home depot instead.]

i didn't take many photos in progress on this one, but it's seriously easy. all i did was trim off the curved part of the paint sticks [i scored both sides with a kitchen steak knife & then gently snapped it apart], sanded the edges just a touch & laid them out to form the letters. you can trim them a little shorter depending on your letter.
then i just painted them with craft paint & used a little brown ink pad and sandpaper to distress them a bit. i marked where i wanted the bolts, drilled a little hole (very gently!), stacked them up & bolted it all together!
the best part is they're seriously light as a feather, so super easy to hang. i just hot glued a picture frame bar on the back & i think it will hold fine.

i loved it so much, i'm making a second one for over the boy's crib... i'm going to do a fun little monogram thing but i'm waiting on one more part to get here so i can finish it. can't wait to 'reveal' the whole nursery!

the letters took me literally about 15 minutes. i think they'd look equally good spelling out something cool on a playroom wall, or a single letter on a mantel, or anywhere else you need a little typography goodness in your decor! is there anywhere you want to get a little (big!) wordy?

10.11.2011

the almost unpaintable pumpkins.

it's finally october, and that means it's time to pull out all the pumpkin decor! here's my pumpkin project for this year:

dollar tree pumpkins before:
and after!
do you totally love the feeling of tackling a project you've had bookmarked/pinned since forEVER ago? i really, really do. in fact, i had this idea bookmarked back before there was a pinterest. [at least before i stumbled upon it.] the shanty 2 chic blog was where i first discovered the illustrious combo of heirloom white spray paint + ralph lauren smoke glaze... or as they put it, 'shanty-ing' something up.

so, i had added their 'shantied' pumpkins to my to-make list about 100.5 years ago, calling them 'white twine pumpkins.' and today, i finally made them!

first, i found these little beauties at the dollar tree. carvable, sure, but apparently the dollar tree should market whatever material these pumpkins are made of to nasa or something as they are almost completly impervious to paint. [don't know why nasa would need anything nearly completely un-paintable, but you know what i mean.]
i'll explain:
first i painted them with gesso, an art canvas primer that i really like any time i'm not sure a surface will accept paint [ie: if i think it will either slide right off or soak right up to where it takes a million coats to cover it.] well, it was a new brand of gesso i'd never used before, and i wasn't impressed. it was basically no different than plain old white paint.

so i went for spray paint, but the nozzle on my heirloom white clogged up or something, as my brand-new can suddenly refused to spray. at all. no matter what i did. grrr.

so i went for just plain cheap white spray paint. and after spraying continuously for about 10 minutes with nearly no color change i stopped and busted out the big guns... kilz. brushed on. primer of all primers. and unbelievably, even that barely provided much coverage.

[i decided to spare you the photos of all these frustrating in-progress painting attempts. i'll just leave it to the before and after as though it was the sweet & simple little project it was supposed to be!]

but i still didn't want them shiny-white, so i pulled out some off-white craft paint & glopped it on nice & thick with a sponge brush. success! there was still the tiniest whisper of that bright orange showing through, but i didn't worry since i knew the glaze would darken it up quite a bit.

so i brushed on & wiped off the glaze & was finally feeling hopeful that they might actually look like i wanted them to when all was said and done! but i did coat them with several very generous hits of clear-coat sealing spray. i did not want all that paint flaking off to that oh-so-lovely fake orange. then it was just a matter of glue gun gluing a little twine on them! & finally, they looked how i wanted them too!
& here's the detail of how i wrapped the stem, although the sun setting makes the pumpkins look a little bluish.
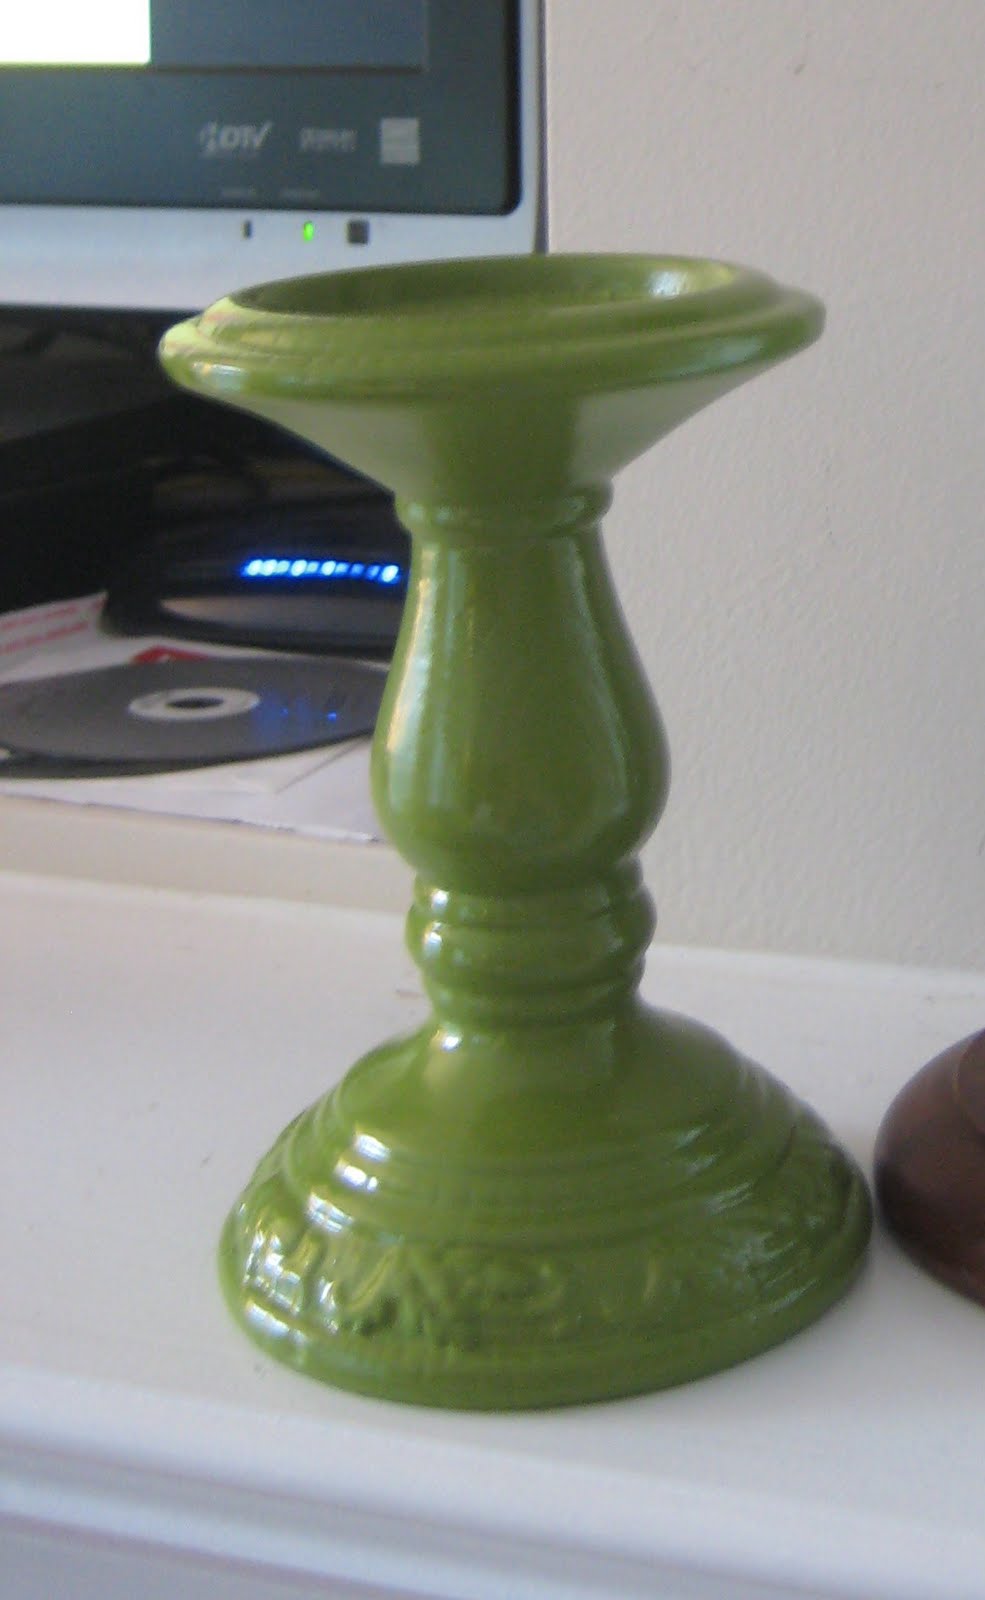
so... $2 dollar tree pumpkins & $534 in paint [not really, just felt like it] & a little twine later... cute mantle place pumpkins that look really cute with my grapevine pumpkins from target a few years ago. and they've found a happy home on my newly thrifted & spray painted candlesticks.
yay! bring on the cardigans and lattes, i'm ready for fall!

10.10.2011

pinteresting: thrifty candlesticks!

so, i know spray painting a candlestick from goodwill is not exactly craft-blog rocket science. but i thought i'd share what a difference a spray makes... i'm so in love with the power of spray paint to transform almost anything, especially the power to make old junk into something beautiful and new!

it started [of course] with an inspiration photo from pinterest:
[by the way, the original pin was just the picture, no website source. i found it later on a blog but forgot which one. if you know/are the original source, please leave a comment to let me know so i can give credit! thanks!]

i loved the green/cream/black mix and was looking for something for my super-boring mantle. now that we're storing the t.v. in the cut out above the fireplace, i've lost my mantle as my seasonal decor spot. i thought some tall candlesticks like these would add some color & drama on each side of the t.v.

i saw lots of cool diy ideas, including making some out of lovely table legs or stair spindles [which i may still have to do to get the third pair tall enough] but my budget was, as usual, next to nothing. crafting on a dime, here, literally!

i first found these golden wonders for free at the student share shop & thought they had great shape! but of course the glittery gold had to go. i picked up a can of a lovely shade of green [eden by rustoleum- been using it everywhere!] & ta da!
then the hunt was on for 2 more pairs in increasing heights right off the bat i found some lovely brown ones at goodwill! i had intended to paint anything i found, but the brown color of these was great! the only problem was they were small at the top for tapers [complete with yucky wax residue of all random colors!] not exactly the look i was going for!
but the price was right:
[sidenote: i'd love to find out one day what the pricing rules/strategy is at goodwill. is it up to each salesperson who sorts it to slap a price on there? or is there a big chart in the back or something?]

so i glued on 2 of these wooden rounds from michael's & stained them brown with minwax dark walnut... & they match almost perfectly! i can see the difference, of course, but not enough that it bothers me.
pretty darn close! and i'm so happy with how they look together, nice and balanced on each side of my mantle:

i'm still on the lookout for a third set that i'd like to be the tallest that i'm thinking of painting a distressed white [the ever-favorite heirloom white probably!]. those are the ones i may have to use a little table leg or stair spindle for.

so... before:
& after... not to shabby for around $6 right? yay!

9.16.2011

pinteresting: bucket storage!

i pinned this photo on pinterest because i thought the little bucket configuration was really cute- especially for like a back door/porch organizer of summer stuff or outdoor toys like sunscreen, shovels, water guns etc.
(originally from apartment therapy, i believe)

then i saw these little pink buckets in the $1 at target & an idea was born for a smaller, table-top version, for storing all my little girl's tiny hairbrushes & accessories that get lost in her bigger toy boxes. i wondered if they even made pink zip ties & then lucked out found the colorful package of them at dollar tree right away!
they're the perfect shade of pink. & if your buckets have little handles, you don't have to drill holes! makes it an even easier & quicker project. just zip tie them all together & then trim the ends!
it looks super cute in her room, and even ended up being just the right size for diapers or pull-ups (which she is only wearing at night now, praise the Lord!).
you can leave it on its side like this, or turn it with the buckets flat. here's another fun, summery way you could use it:
super cute, super easy, super quick project, all for only $4! love it!

9.10.2011

supplies!

$20 at the hardware store gets me excited about life. i love the thrill of fresh supplies... new projects are coming soon!

9.08.2011

something lovely this way comes...

you can always tell when a craft show is approaching in this house... my kitchen counters start to look like this:
thankfully, my family is always super patient and gracious with me... and by family, i really mean my amazing husband who must be constantly biting his tongue when there is about a one inch square space of countertop left on which to make a sandwich, etc.

love him.

but i'm proud of myself for trying to really plan ahead this time [like, 2 months ahead of time!] so as to avoid the major stress of trying to build up inventory the week of a show. and after a couple late nights of painting, i have a nice little stack of nearly-finished hairbow holders & more in progress! yay!
& my sweet family can rest assured, knowing that come november 5th when sebts craft & bake is over, the house will get back to what passes for normal around there!

9.07.2011

diy in strange places.

i'd love to peek in on the meetings where they decide how to decorate places like anthropologie & starbucks. anthro is well-known for their super-interesting store displays, & i've seen some really interesting coffee-inspired & repurposed elements in our local starbucks. right now they have a really cool painting that looks like it was painted in coffee grounds, & once i saw what looked like a canvas decoupaged with used coffee filters- sounds odd, but they looked like really cool coffee-dyed ruffly circles, almost doily-like.

when i stopped by for a recent iced coffee [my almost-daily summer staple] i saw two new cool things i really liked & thought would be cool even in a home rather than a coffee shop. [please excuse the creepy stalker-like cellphone photos.]

the first was a configuration of what looked like canvases [or wood or cardboard or something!] covered in burlap coffee bags. i love the look of the bags' printing showing up randomly, and i think this could be cool if you stretched the burlap around pieces of cork for a unique corkboard, especially in a home office! i like the extra-large scale of it too- it fills the space so nicely!
[sidenote: does it bother you when people sit in coffee places with their feet up like they own the place? like they're at home chillin' in their bathrobe or something. feels a little unsanitary to me for some reason.]

the second was a chalkboard wall- nothing to new or exciting there, but i thought the way they had sectioned it off with pieces of wood almost like a chair rail was creative. you could even use white moulding for a really nice finished look.
sorry, random dude in starbucks. didn't mean to take a stalker-esque photo of you! just goes to show, you never know where you'll find crafty decorating inspiration!

LinkWithin

Related Posts with Thumbnails